I’m writing this to mainly help one person’s request on formatting their book for publication on Kindle, but I’m hoping this might be useful to a few others as well. This will be a broad, basic, step by step process to try and catch most common formatting errors. Long as nothing’s completely bizarre with your Word file, this should get a nice, clean upload.
Side note: I did all this in Word 2007. I think 2010 is very similar, though older versions might look a little different. I *think* every command I’ve given should still be easy to follow in older versions.
Oh, and I have zero experience with Macs. All of this advise is aimed at PC users. If you can somehow read and translate this so it’s useful for you as a Mac user, I’m glad, but I make no promises.
0. Before anything else: save a copy. So Book A, save as Book A Formatted. That way, if something goes horribly wrong, you still have the old, pre-formatted book.
1. First, under View, set it to Draft. This should help make sure my screen shots look similar. Also, if you’ve already added your book cover to the Word document, delete it now. Smashwords adds it manually, and I’ll show you how to correctly add it to the PRC file later in these steps (you do have a book cover, right? If not…shame!!!)
2. Select the entire document with ctrl + a. Change the font to Times New Roman. Don’t care what your personal favorite font is. Just need the document uniform, and a standard font. TNR does the trick. While you’re doing this, go ahead and set the font size to 12.
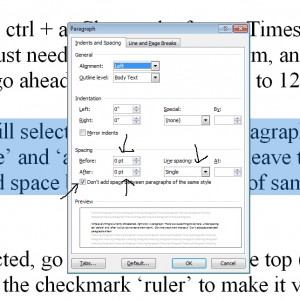
3. While everything is currently still selected, right click -> paragraph. There’s a couple things to do here. Under spacing, set ‘before’ and ‘after’ to 0 pt (do not leave them blank). Click the checkmark that says “Don’t add space between paragraphs of same style.” Set the spacing itself to Single. Hit ok.
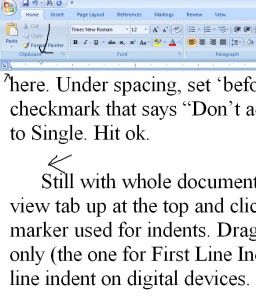
4. Still with whole document selected, go to your ruler up at the top (if you can’t see it, go to the view tab up at the top and click the checkmark ‘ruler’ to make it visible). You should see the little marker used for indents. Drag everything all the way to the left. Then, adjusting the top triangle only (the one for First Line Indent) drag it forward about 0.2 to 0.3 inches, which forms a nice first line indent on digital devices.
Time to remove some common problems next.
5. Hit ctrl + f to open up the Find menu, then click the Replace tab. In the find tab, type ^t while in the replace tab, leave it blank. This will delete all the manual tabs (which you should never, ever use). Hit replace all. And please, do not forget to input the ^’s.
6. Clear the find tab, and type in ^l (that’s a lower case L) in the find, and in the replace, ^p. Just trust me on this one. Hit replace all.
7. Clear the find tab, and then put in two spaces. In the replace section, hit the spacebar once. This will find any hidden sections where you accidentally hit the space bar twice while typing. Hit replace all. Hit replace all again. Next, in the find tab, type in “ .” That’s a space followed by a period (don’t type the quotation marks, just using them to help show the spaces). In the replace, type just a period. Same idea, except for accidental gaps between words and the period at the end. Hit replace all.
8. Some of you might have underlined instead of italicizing things. Well, we want them in italics now. So clear the find section, and with cursor within, hit ctrl + u. In the replace, again clear it out, put in the cursor, and hit ctrl + i. Hit replace all.
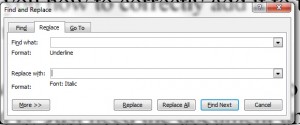
9. Moving on to ellipses. In the find, type in “…” while in the replace, this is what I want you to do. With the cursor inside, hold down your alt key on your keyboard, and then on your number pad hit in order, 0133. Let go of the alt key. Hit replace all. Now in the find, go ahead and write “. . .” while leaving the ellipses alone in the replace. Hit replace all.
10. Dashes, em dashes, all evil! Okay, in the find, type in “––”. That’s two regular dashes side by side. With cursor in the replace, hold the alt key and then on the number pad hit 0151. When you let go, you should have: — instead. Hit replace all.
11. Still using the find/replace. We’ll do two more here, both similar. First, in the find, type in ” ^p”, and in the replace, just “^p”. Do this again with “^p “, leaving the replace part still as “^p”. This will get rid of any spaces before or after paragraph breaks, which can jack up formatting on certain devices.
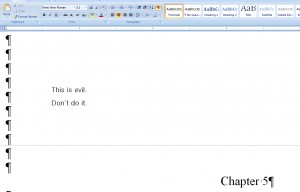
12. Okay, go ahead and close the find and replace tool. We’re moving on to the next (very) common problem. Do not, under any circumstances, try to form new pages by doing anything other than hitting ctrl + enter on your keyboard. That means hitting enter six times until you saw a new page line. This is bad. So on your toolbar at the top, click the following symbol:
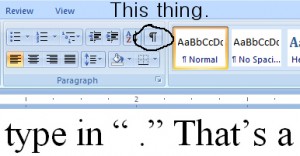
All right, now start scrolling through your document, specifically going to each individual chapter break. If you see the evil line of P’s, delete them, and use ctrl + enter to place in an actual page break. Note: please leave these symbols showing for the rest of your formatting experience. Thanks.
13. Let’s get chapter titles set up next to look all pretty. Go to your first chapter heading. You can have just the number, or Chapter 1, or Ch. 1, or whatever suits your fancy. Just select it, and then hit ctrl + e (the shortcut for centering). If you used tabs to center it, or hit the spacebar twenty times, Word should automatically delete them. Be thankful, because apparently this horrible instinct of writers is far more common than I’d like to believe. Now, go ahead and bold it (ctrl + b if you like shortcuts) and then change the font size from 12 to 14.

14. You should now have your chapter titles looking how you want them. With it still selected, right click -> styles -> create new quick style. Name it Chapters. If that’s taken for some reason, call it DavidChapters.
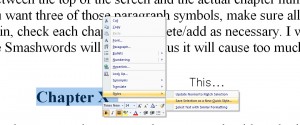
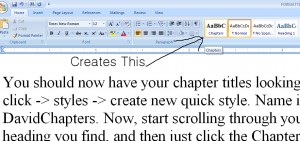
Now, start scrolling through your document. Put your cursor on every chapter heading you find, and then just click the Chapters style to apply it. While doing this: you will probably want a little bit of space between the top of the screen and the actual chapter number. The key is to be consistent, so if you want three of those paragraph symbols, make sure all have three. If you want just two, then again, check each chapter and delete/add as necessary. I wouldn’t go more than three, though, because Smashwords will get mad, plus it will cause too much white space on smaller screens.
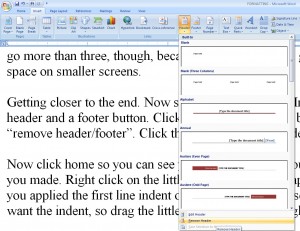
15. Getting closer to the end. Now some clean up. Under Insert at the top, you should see both a header and a footer button. Click each one, then at the bottom you should see an option for “remove header/footer”. Click those. No need for headers/footers in the digital world.
16. Now click home so you can see your styles. Scroll through them until you find that Chapters style you made. Right click on the little style box called Chapters, then Select All. Now remember how you applied the first line indent on the ruler? Since these chapter headings are centered, we don’t want the indent, so drag the little first line indent triangle back left so its flush with the others.
17 (optional). Almost done. Now, you may not care about having this, so if you don’t, feel free to skip. I like having the first letter in a section with no indent, and slightly bolded and larger (kind of like a drop cap). This is my simple, easy/dirty method to make them. Go back up to the top of your document, and find your first paragraph in your first chapter. Select just the first letter, like so: <insert picture>. Bold it (ctrl + b), set its font size to 14. Just as before, right click on it and save it as a new style, this time called First Letter. Now the time consuming part: go through your document looking for all your section breaks and chapter breaks, highlight the first letter, and click First Letter style to apply it. Once you’ve done this, do the same as the step 13 above for Chapters to select them all and remove the first line indent.

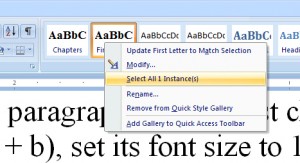

18. Now save your document, which should look much nicer than when we started. There’s a few steps to do now, one for Smashwords if you’re distributing there, and one for Amazon.
Amazon: Click file (or the little round office button, depending on your version) -> save as -> other formats. Choose to save it was Web Page, Filtered. We’ll use this newly created HTML file in the next section below.
Smashwords: Assuming you already have a title page at the beginning of your book (and if not…why don’t you?) … anyway, go back to your title page. You need to add a few things, so it looks like below.
Title of Book
by David Authorguy
Smashwords Edition
Copyright 2012.
After that, time to save again. File (or office button) -> save as -> Word 97-2003 Document. Yes, Smashwords does not accept .docx files, so this is what you’ll need. Now your file might already be in doc format, but just in case, do this step anyway.
For Smashwords: you’re done. The file is ready to upload for the meatgrinder. For Kindle, however, we have a few more steps.
MOBIPOCKET CREATOR
update: October 2013: As of now, Amazon does not support the uploading of PRC files, which the following section creates. I will leave this here, but know that if you followed my above methods, directly uploading the word document will *probably* get you the best benefits.
There we go. That should help divide this section up. Okay, you need to go here: http://www.mobipocket.com/en/downloadsoft/DownloadCreator.asp and download and install Mobipocket Creator. This is the program we’ll be using for all these steps.
1. Okay, once it’s installed, run the program. You’ll get the initial start up menu. Of all these choices, you want to click, under Import From Existing File, the first option, HTML Document.
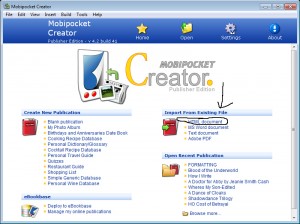
2. Next screen, you’ll need to click browse and find wherever it was you saved the Web Page, Filtered file from earlier. Select it, then click import.
3. All right, now we’ll go through the various options here. First, click cover image on the left. Add your cover image, finding wherever you have the file saved on your computer. Click update at the bottom.
4. Book settings: change Book Type from Default to eBook. Click update.
5. Metadata: this isn’t crucial, but do it anyway. Punch in your eBook title and your author name (don’t worry about the rest). Scroll down and click update.
6. Okay, now up at the top row of commands, you’ll see Build. Click that. Under the options that pop up next, leave it as no compression, no encryption. Click build. Now it’ll build it, and give you options of what to do next. Click “open folder containing ebook”. Okay, now this will show you where your PRC file is located. For convenience, you might want to just drag the PRC file onto your desktop (you can always recreate it fairly easily if need be, and once you upload the PRC file to Amazon, you can just delete it off your desktop).
7 (optional). Now, if you take the charger that came with your Kindle, pull off the electrical plug end, you’ll have a USB connector. Plug that into your PC, the other into your Kindle, and you can actually copy and paste the above PRC file onto your Kindle itself. The best thing about this is then you can unhook your Kindle, turn it on, and see *exactly* how your book will look like when it’s for sale. If this is your first time, I’d definitely click next page repeatedly to check your entire book, looking for any weird or bizarre formatting errors, hopefully which you can correct with ease.
8. Okay, that done, take that PRC file, go to Amazon, and upload the PRC directly where Amazon asks for your book content. And you’re done! Everything work out great? Then good luck, have fun.
If there’s errors, or weird complications…sorry. This guide is meant to help with the most basic of problems, a nice guideline to get things looking sane. Sometimes, particularly if you’ve done weird formatting on your own in the past, or jacked with Styles, you can get some strange errors. So if you have a specific, and I want to emphasize that, specific problem, go to http://www.kindleboards.com/index.php/board,60.0.html, create an account, and say hello. There’s a ton of indie authors there, all who’ve formatted for Kindle, and have loads of experience. They’re on the nicer side, too. Ask your question, providing as much detail as you can about what’s going on. Odds are high your problem will be solved.


